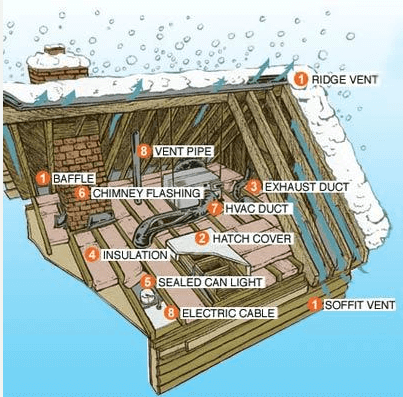
Icicles hanging along the eaves of your house may look beautiful, but they spell trouble. That's because the same conditions that allow icicles to form—snow-covered roofs and freezing weather—also lead to ice dams: thick ridges of solid ice that build up along the eaves. Dams can tear off gutters, loosen shingles, and cause water to back up and pour into your house. When that happens, the results aren't pretty: peeling paint, warped floors, stained and sagging ceilings. Not to mention soggy insulation in the attic, which loses R-value and becomes a magnet for mold and mildew. Keep reading to learn more about how ice dams form so that you can prevent them altogether or make a quick fix if they've already formed. Tip: To keep ahead of water damage, snap photos where you see frosty buildup. Use the pictures to help target an interior inspection, during which you should check for leaks. Here's a breakdown of the conditions that lead to the formation of ice dams: First, heat collects in the attic and warms the roof, except at the eaves. Next, snow melts on the warm roof and then freezes on the cold eaves. Finally, ice accumulates along the eaves, forming a dam. Meltwater from the warm roof backs up behind it, flows under the shingles, and into the house. Hacking away at ice dams with a hammer, chisel, or shovel is bad for your roofing—and dangerous for you. And throwing salt on them will do more to harm to your plantings than to the ice. Short of praying for warm weather, here are stop-gap measures we recommend. Blow in Cold Air Take a box fan into the attic and aim it at the underside of the roof where water is actively leaking in. This targeted dose of cold air will freeze the water in its tracks. You'll stop the leak in a matter of minutes. Rake It Rake off snow with a long-handled aluminum roof rake while you stand safely on the ground. A rake with wheels, like the one shown here, will instantly change the exterior temperature of your roof without damaging shingles. Deice It You can also diminish the damage after the dam has formed with...panty hose! Fill the leg of discarded pair of panty hose with a calcium chloride ice melter. Lay the hose onto the roof so it crosses the ice dam and overhangs the gutter. If necessary, use a long-handled garden rake or hoe to push it into position. The calcium chloride will eventually melt through the snow and ice and create a channel for water to flow down into the gutters or off the roof.+ Permanent Fixes for Ice Dams Getting rid of ice dams for good is simple, in principle: Just keep the entire roof the same temperature as the eaves. You do that by increasing ventilation, adding insulation, and sealing off every possible air leak that might warm the underside of the roof. By taking care of common trouble spots, listed here in order of priority, you should enjoy dam-free winters and use less energy to boot: 1. Ventilate Eaves And Ridge. A ridge vent paired with continuous soffit vents circulates cold air under the entire roof. Both ridge and soffit vents should have the same size openings and provide at least 1 square foot of opening for every 300 square feet of attic floor. Place baffles at the eaves to maintain a clear path for the airflow from the soffit vents. 2. Cap the Hatch. An unsealed attic hatch or whole-house fan is a massive opening for heat to escape. Cover them with weatherstripped caps made from foil-faced foam board held together with aluminum tape. 3. Exhaust to the Outside. Make sure that the ducts connected to the kitchen, bathroom, and dryer vents all lead outdoors through either the roof or walls, but never through the soffit. 4. Add Insulation. More insulation on the attic floor keeps the heat where it belongs. To find how much insulation your attic needs, check with your local building department. 5. Install Sealed Can Lights. Old-style recessed lights give off great plumes of heat and can't be insulated without creating a fire hazard. Replace them with sealed "IC" fixtures, which can be covered with insulation. 6. Flash Around Chimneys. Bridge the gap between chimney and house framing with L-shaped steel flashing held in place with unbroken beads of a fire-stop sealant. Using canned spray foam or insulation isn't fire safe. 7. Seal and Insulate Ducts. Spread fiber-reinforced mastic on the joints of HVAC ducts and exhaust ducts. Cover them entirely with R-5 or R-6 foil-faced fiberglass. 8. Caulk Penetrations. Seal around electrical cables and vent pipes with a fire-stop sealant. Also, look for any spots where light shines up from below or the insulation is stained black by the dirt from passing air. Advanced roofing team with any of your ice damming concerns or if you would like us come to your home to remove the snow and ice from your roof to prevent any damage. (847) 945-6565 or email us at adv.roofs@yahoo.com |
|
|